|
Fill in form fields (web browser) |

|

|
|
|
Fill in form fields (web browser) |

|

|
Fill in form fields (web browser)
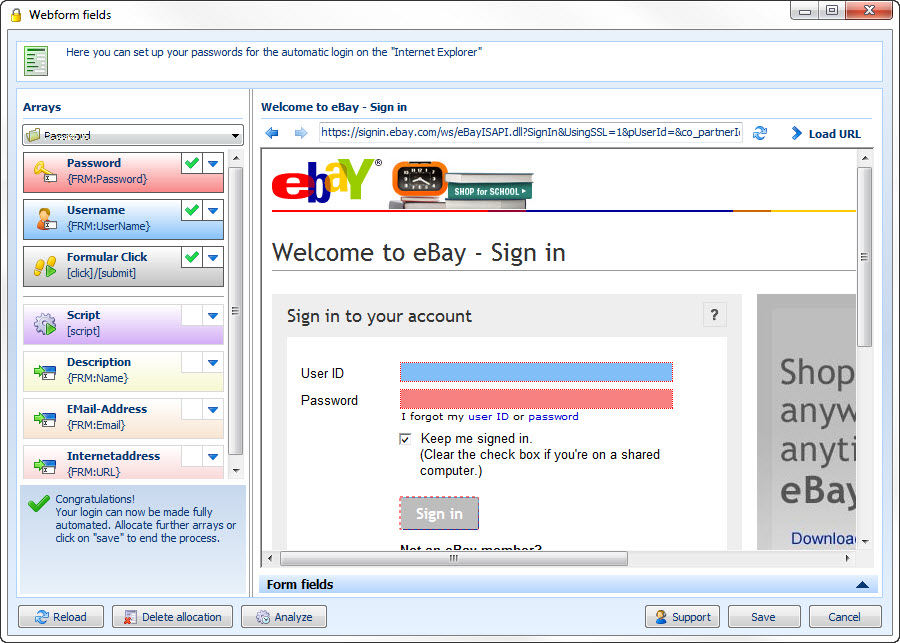
By means of this function you can realize an automatic login on internet sites. After you have clicked in the menu start application under the tab data link at fill in form fields (web browser) on the button edit, the following window opens, in which the accordant website is shown.

In the left part of the window you see the field list. This is dynamic and shows you all available fields in the form.
On the right side you see an integrated webbrowser. This shows you the chosen website of the application. Furthermore the browser has the following push-buttons:
![]() one page back in the browser
one page back in the browser
![]() one page forward in the browser
one page forward in the browser
![]() loads the page again
loads the page again
![]() loads the web address which has been entered in the address field
loads the web address which has been entered in the address field
![]()
Furthermore you find several buttons
![]()
Loads the fields from the current site again
![]()
Deletes the currently set allocation
![]()
Analyses the website for possible adequate fields
![]()
Gives you the possibility to send a support request
![]()
Saves the settings
![]()
Aborts the current action
In order to make the allocation easier you have got two mechanisms available.
Automatic allocation
Via the button analyse the website will be scanned for potentially appropriate fields. If Password Safe has found appropriate fields, the allocation is made automatically. This will be shown to you by markings in terms of color.


Here for example the blue marking demonstrates that the field user name has been assigned to the field email.
The red marking demonstrates that the two fields password have been recognized and linked.
![]()
Drag the field form click on the accordant button in the form of the website for sending the form This field activates a mouse click.

Drag for example the button script on the first field of the web form (e.g. email, user name, etc.) in order to do the login with the help of a script.
You can find further information on scripts under script for entry sequence.
Manual allocation per Drag and Drop
At some websites it can happen that the automatic allocation does not take effect. This is for example the case if the field names for the identification of the field are not clear.
The allocation of the fields is made simply and in an uncomplicated way per Drag and Drop. To do so just drag a form field on the accordant field of the website.
Manual allocation via the form field list
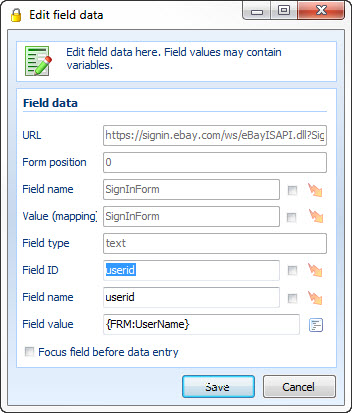
Via ![]() the form field list is shown. Here you can edit the field data with a double click, that means you can choose fields manually which should be entered at the automatic entry. In this mode you can also use own fields for the filling.
the form field list is shown. Here you can edit the field data with a double click, that means you can choose fields manually which should be entered at the automatic entry. In this mode you can also use own fields for the filling.

![]() Display available variables: Lists all available variables (form fields) of the linked dataset
Display available variables: Lists all available variables (form fields) of the linked dataset
URL
Here the URL is displayed. A manual change is not possible.
Field ID
This is the ID of the determined field. Via regular expressions also randomly generated fields can be allocated correctly.
Field name
This is the name of the determined field. Via regular expressions also randomly generated fields can be allocated correctly.
Field value
Via the field value you can directly allocate data from the dataset. It works via variables. Either enter the field value directly or click on the push-button next to the field and choose the variables that are available at the dataset. However, the allocation of variables is only possible if the application is already linked with a dataset.
Commands as field values
Also the following commands can be allocated as field values:
[check] -> Sets a check mark into a check box or activates a radio button.
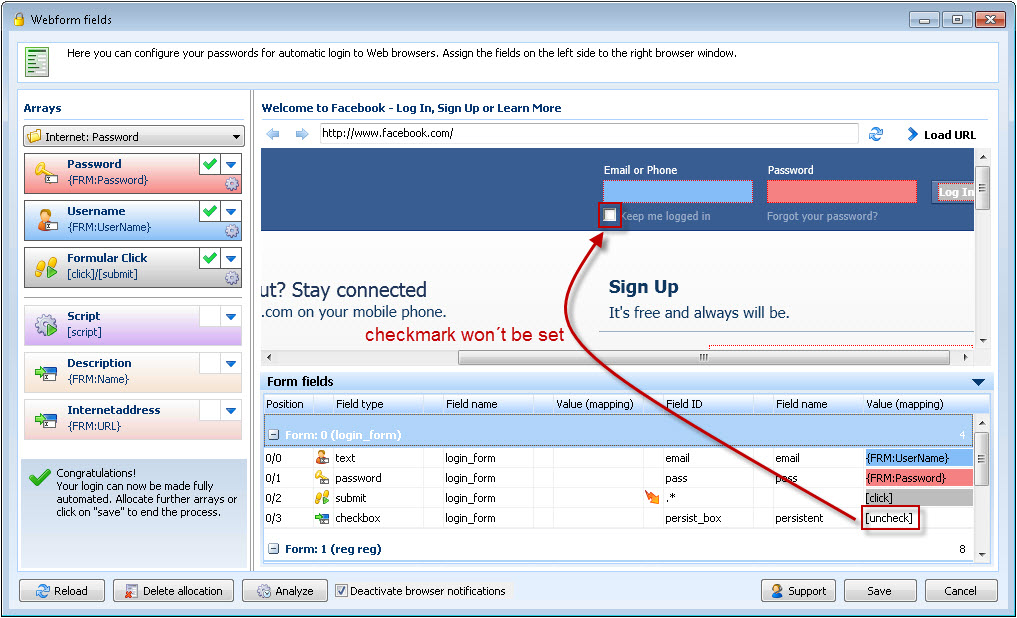
[uncheck] -> Deletes a check mark in a check box (via this for example the option „stay logged in“ can be deactivated permanently) or deactivates a radio button
[click] -> Carries out a click on a button or a symbol
[submit] -> Transfers a submit to a button or a symbol
Example:

In this example the command [uncheck] is transmitted. This causes that the option „stay logged in“ is deactivated at every automatic entry. Here it is not important if a check mark is set or not at the call up of the page.